Pilot-hole chart
A wood-screw pilot hole gives the screw's solid core room to enter while leaving enough wood for the threads to bite. The correct starting size depends on screw number, root diameter, thread design, wood density, moisture, grain direction, and distance from an edge. Use the sourced chart below for traditional wood screws, then test the exact screw in an offcut.
Albany County Fasteners publishes separate softwood and hardwood recommendations for common screw sizes. Hardwood pilots are generally larger because dense fibers resist displacement and increase the risk of splitting or screw breakage. Modern construction, cabinet, pocket-hole, and specialty screws may have their own manufacturer tables; those instructions take priority.
How to choose the starting size
Identify the screw, not just its nominal length. Record the gauge or number, thread type, shank shape, head, and manufacturer's product line. Compare the drill bit to the screw's solid root between the threads. A traditional visual method is to hold the bit in front of the screw: it should cover the core while leaving the threads visible, but use a published table when available.
Choose the softwood or hardwood column based on the actual species and density, not the botanical label alone. Poplar behaves differently from hard maple even though both are hardwood species. End grain and a hole near an edge may need more caution than a centered face-grain hole.
Start with the recommended size and make a test. If driving torque is excessive or the wood begins to split, stop rather than forcing the screw. If threads barely hold, verify that the pilot did not use a clearance-hole diameter or wander oversize.
Pilot, clearance, and countersink holes
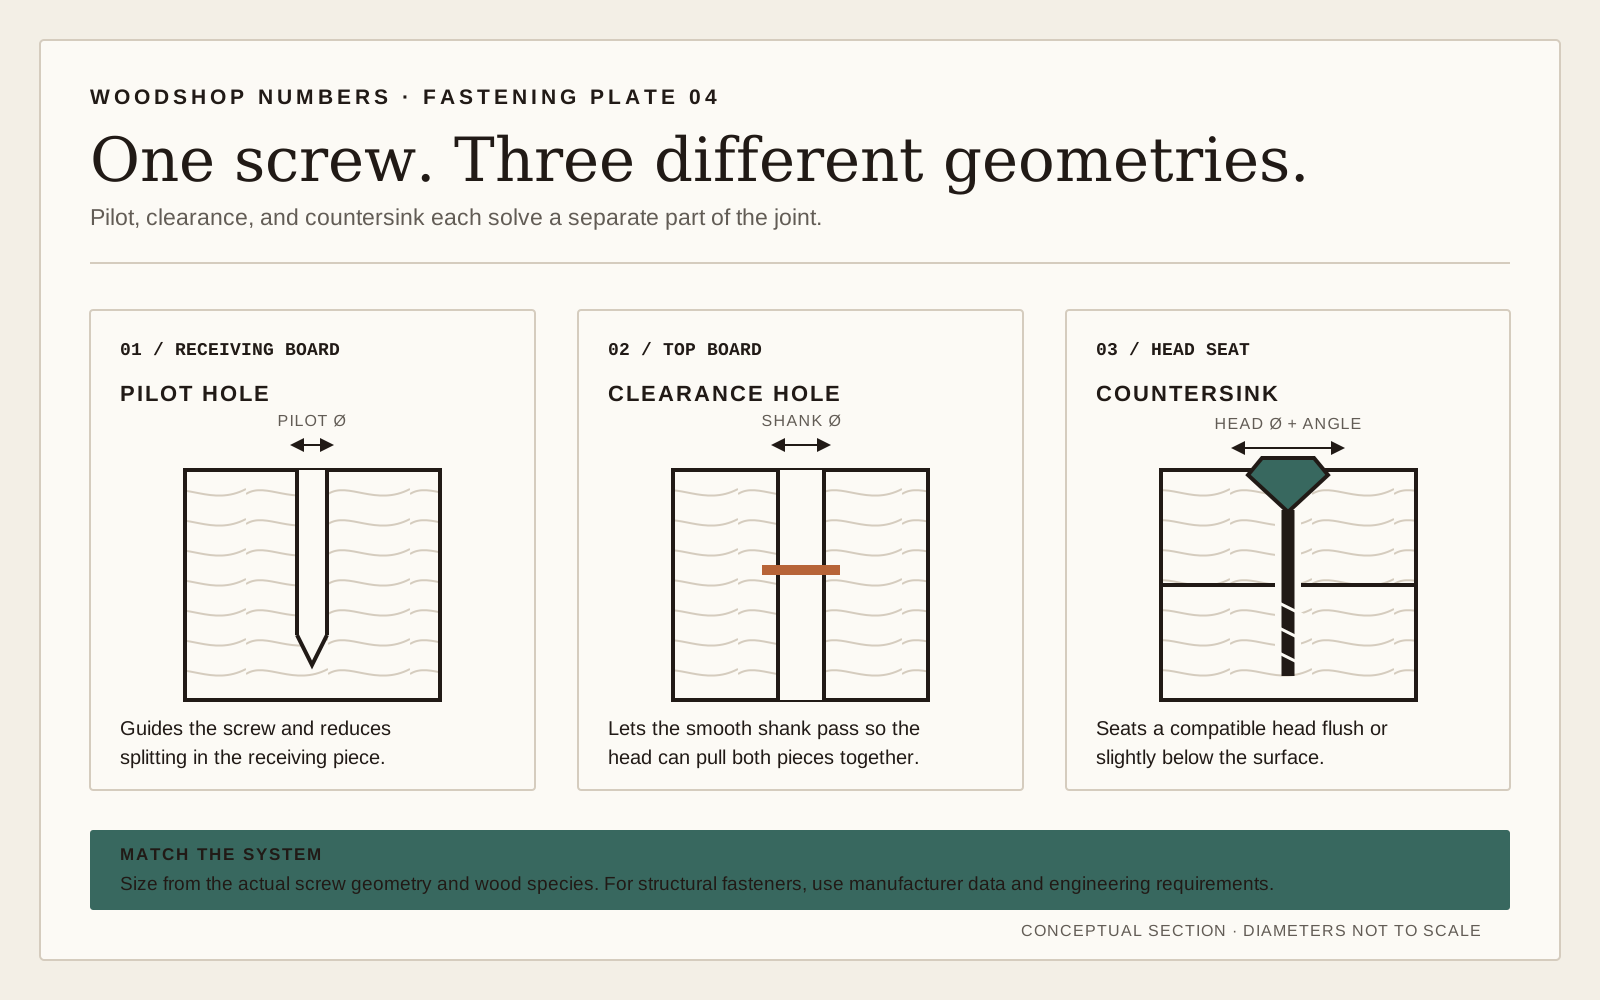
When two boards are joined, the threaded portion should pull the lower board toward the upper board. A clearance hole through the top piece lets the screw shank slide instead of threading both pieces apart. Without it, the boards can remain separated even when the head appears tight.
The pilot continues into the lower piece and is smaller so the threads engage. A countersink creates a cone for a flat-head screw to sit flush. A counterbore creates a flat-bottomed recess for the head and possibly a plug. These are separate operations even when a combination bit performs them in one pass.
Match the countersink to the head angle and diameter. An oversized countersink leaves a crater; an undersized one crushes fibers and keeps the head proud. For softwood, a screw head may compress the surface, but relying on crushing produces inconsistent depth and can split a narrow part.
Drilling depth and edge distance
Pilot depth, edge distance and clearance are screw-system and material decisions. Do not rely on a universal “slightly shorter than the screw” rule: some screws need full-depth pilots, stepped holes or manufacturer-specified embedment, while structural screws can carry mandatory spacing and edge distances.
Use the current screw data for pilot diameter and depth, then mark depth with a stop collar or reliable guide. Clear chips from deep holes and keep the drill aligned. For critical joints, narrow stock or end grain, test the exact screw and driver setting in the actual species before drilling project parts.
Test the exact screw and wood
Use an offcut from the same board or panel, with the same grain orientation and edge distance. Drill the pilot and clearance holes, add the countersink, drive with the intended tool and clutch setting, then inspect both faces and the edge.
The screw should seat without smoking, squealing, splitting, or stripping. Remove it once and inspect thread definition. Repeated-removal hardware may need inserts or a different fastener rather than a tighter pilot.
For plywood and MDF, core construction changes the result. A pilot that works in solid oak may not be right in a plywood edge or MDF face. Use panel-specific screws where appropriate and keep tests from a production offcut.
Set the driver's clutch during the test rather than after damage appears. Begin low and increase only until the head seats. Impact drivers can hide rising torque and overdrive a small screw quickly, so a drill-driver or hand finish may give better control on delicate parts. Record the bit, pilot, countersink, and clutch setting for repeated hardware.
Diagnose split wood and stripped holes
Splitting usually points to a pilot that is too small, a screw too close to the edge, excessive screw diameter, missing clearance hole, or driving without clamping. Stop, enlarge the pilot only as needed, and test again. Lubrication is sometimes recommended for traditional screws, but check finish compatibility and fastener guidance.
A stripped hole can come from an oversized pilot, overdriving, low-density material, or repeated assembly. A larger screw is not always a safe fix because it adds wedging force. Move the hole, repair it with a sound wood plug and redrill, or use an insert designed for the material and load.
A broken screw signals excessive torque, a small or shallow pilot, a weak fastener, or hard material. Do not continue driving matching screws with the same setup. The test piece exists to reveal that problem before it occurs in the project.
| Screw size | Softwood pilot | Hardwood pilot | Clearance hole |
|---|---|---|---|
| #4 | 5/64 in. | 3/32 in. | 1/8 in. |
| #5 | 5/64 in. | 3/32 in. | 9/64 in. |
| #6 | 3/32 in. | 7/64 in. | 9/64 in. |
| #7 | 3/32 in. | 7/64 in. | 5/32 in. |
| #8 | 7/64 in. | 1/8 in. | 11/64 in. |
| #9 | 7/64 in. | 1/8 in. | 3/16 in. |
| #10 | 1/8 in. | 9/64 in. | 3/16 in. |
| #12 | 9/64 in. | 5/32 in. | 7/32 in. |
| #14 | 5/32 in. | 3/16 in. | 1/4 in. |