When iron-on edge banding is the right choice
Iron-on edge banding covers the layered edge of plywood or the porous edge of MDF with a thin veneer or synthetic strip backed by heat-activated adhesive. It is a good fit for cabinet boxes, shelves, closet parts, and furniture edges that need a clean appearance but will not take repeated hard impact.
Choose solid-wood edging instead for a bench front, dining-table perimeter, chair part, or other edge that will be struck, heavily rounded, or refinished many times. Solid edging adds durability and allows a routed profile. Iron-on veneer is faster and visually light, but it has little material to sacrifice.
Match the banding to the face species and final finish. Buy a width slightly greater than the measured panel thickness so both faces can be trimmed flush. Test color, adhesive, heat, and finish on an offcut from the project.
Prepare the plywood edge and banding
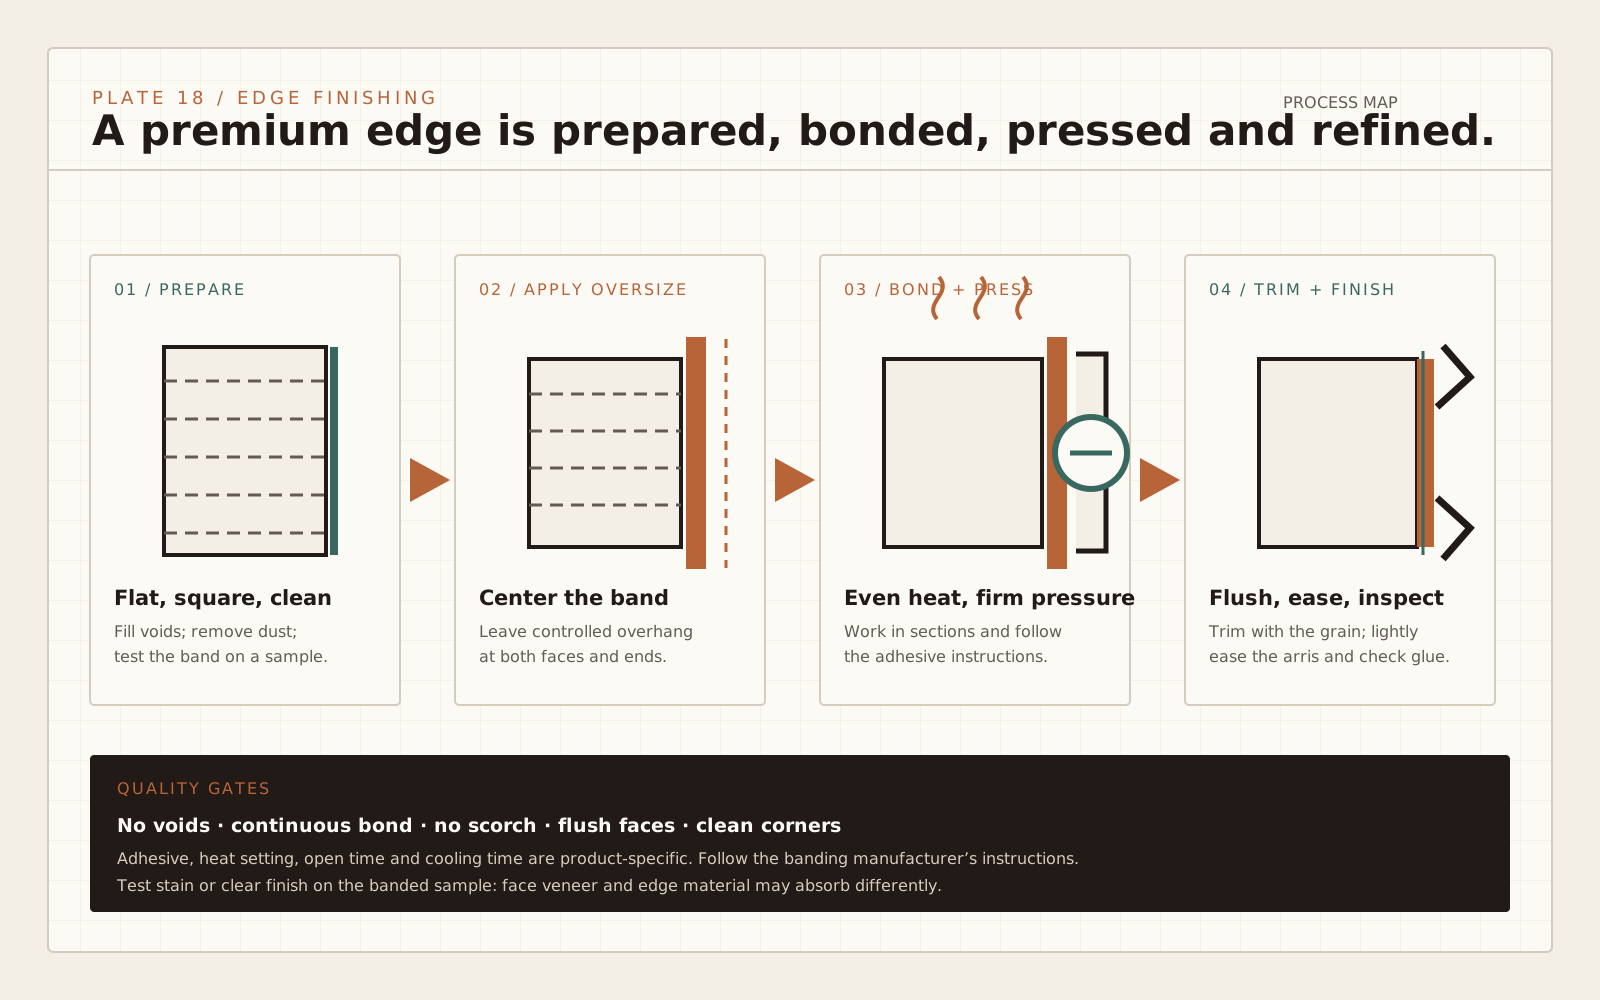
Apply banding before assembly whenever that gives unobstructed access. Mark the show face and sequence corners so the most visible edge overlaps the less visible end. Complete major panel sizing first; banding cannot hide a wavy cut.
The edge must be straight, flat, square, clean, and free of loose fibers. Sand lightly with a flat block only enough to remove splinters and saw marks. Do not round the corners. Vacuum thoroughly and wipe according to the banding manufacturer's directions. Dust trapped under the strip creates bumps and weak areas.
Cut the strip slightly longer than the edge. Inspect real-wood veneer for grain runout or a split that could grow during trimming. Center it so overhang is even on both faces. Secure the panel at a comfortable working height with the edge horizontal or vertical according to the pressing method.
Use a dedicated, clean iron without steam, or the heat tool recommended by the manufacturer. Household temperature markings vary, so begin with the product directions and offcut test rather than treating one setting as universal.
Heat and press the adhesive
Place the banding glue-side down and start near one end. Move the iron slowly enough to melt the adhesive but not so slowly that the veneer scorches or a synthetic strip deforms. Work in short sections and keep the strip centered.
Immediately follow the iron with a hard roller, rounded wood block, or other recommended pressure tool. Pressure matters because the adhesive must contact the entire plywood edge while it is fluid. Press from the center toward the sides to reduce trapped air. Reheat a dry-looking spot and press again before moving on.
At the ends, make sure heat reaches the final area without tipping the iron onto the panel face. Support overhanging veneer so it does not split along the grain. After the full edge is bonded, make one inspection pass and press any questionable section while warm.
Let the adhesive cool fully before trimming. Warm glue can creep and a warm strip can tear away from the edge. Cooling time varies with the material, room, and adhesive, so follow the product guidance and use the offcut to confirm.
Trim ends and faces cleanly
Trim the ends first. A sharp chisel, veneer cutter, or fine saw can cut nearly flush; support the veneer and cut toward the panel so the grain does not split past the corner. Leave a trace for final sanding rather than levering the strip off.
For the long overhang, use a sharp edge-band trimmer, wide chisel, block plane set for a very fine cut, or a router setup designed for the task. Read the veneer grain. A two-sided trimmer is fast but can tear difficult grain; reversing direction or trimming one side at a time gives more control.
Keep the tool registered on the plywood face and take thin cuts. The goal is a flush edge, not a bevel into the face veneer. If using a router, support the base fully and test depth on scrap. A bearing or bit contaminated with glue can mark the face.
Finish the edge without sanding through
Use a flat sanding block and light strokes to remove the final proud fibers. Tilt the block only enough to break the sharp corner. Heavy rounding quickly exposes plywood plies beneath the thin banding. Run a fingertip across the joint after the tool is stopped and dust is removed; a ridge that catches finish needs correction.
Real-wood banding can usually receive the same stain and clear finish as the face, but it may absorb color differently. Sand both to a consistent sequence and test the finish. Remove glue smear completely because it blocks stain. Synthetic banding requires a compatible coating or may be intended to remain prefinished.
At outside corners, decide which strip terminates and which overlaps. Trim the first edge flush before applying the second. A clean seam is easier to hide when grain and color are matched intentionally.
Fix bubbles, loose ends, and peeling
A bubble usually means insufficient heat, pressure, or contact. Protect the face, reheat the area, and press until cool. If the adhesive has debris under it or no longer bonds, lift only as much as needed, clean according to the product instructions, and patch or replace the strip.
Loose ends often come from poor edge preparation or trimming before the glue cooled. Reheat and press if the adhesive is still viable. For a damaged corner, a small matching patch may be less visible than reheating a long edge repeatedly.
Peeling along a hard-use edge signals that iron-on banding was the wrong material or that moisture and heat exceed its service. Replace it with solid edging or redesign the protection rather than repeating the same repair.
| Method | Best for | Main advantage | Main limitation |
|---|---|---|---|
| Iron-on wood veneer | Cabinets, shelves, furniture | Fast and stainable | Thin and impact-sensitive |
| Synthetic banding | Painted or prefinished casework | Consistent color and easy cleaning | Finish compatibility varies |
| Solid-wood edging | Tops, benches, routed profiles | Durable and repairable | More milling and glue-up work |
| Exposed plywood edge | High-ply decorative panels | Honest layered appearance | Requires clean core and careful sanding |
Primary references
Use the current product label, technical data sheet, safety data sheet and machine manual for the exact item in your shop. These primary references frame the general guidance on this page.
Frequently asked
Can I use a household iron for edge banding?
Yes when the product permits it, but use a clean dedicated iron without steam and establish heat on an offcut. Household temperature controls vary.
Should edge banding be applied before assembly?
Usually, because the full edge is easier to heat, press, and trim. Plan corner overlaps and any joinery before deciding the sequence.
Why is my edge banding peeling?
Common causes are dust, an uneven edge, insufficient heat or pressure, trimming while warm, moisture, or using thin banding on a high-impact edge.
Can plywood edge banding be stained?
Real-wood veneer can usually be stained, but it may take color differently from the face. Sand consistently and test the complete finish on scrap.
How do I trim edge banding without splitting it?
Use a sharp tool, read the grain, take thin cuts, and change direction when fibers lift. Leave a trace for light block sanding rather than forcing a flush cut.